
When a pipe freezes, the real problem often shows up after the thaw, when pressure forces water through a split you could not see. Your first job is to slow the leak down so a small crack does not become a soaked ceiling, warped floors, or a moldy wall cavity. In this blog, we’ll walk through what to shut off, what to drain, what to document, and what to avoid so you do not make the damage worse. At Rosenberg Plumbing & Air, in San Antonio, TX, we help homeowners take quick, practical steps when frozen pipes turn into leaks.
Recognize When a Freeze Became a Break
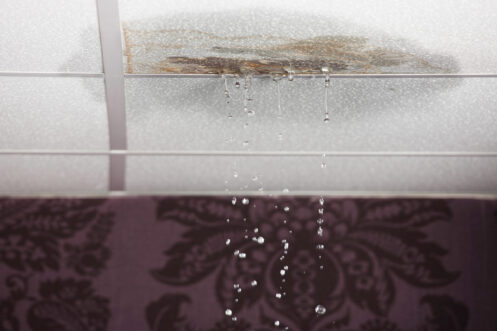
A frozen pipe problem does not always look dramatic. You might notice a faucet that sputters, then stops, or a toilet tank that fills slowly after a flush. You may hear a dull thump inside a wall when the heat turns on, followed by an ominous silence. A crack can form while the pipe is locked in ice, then start leaking later when the ice loosens and water pressure returns. That timing is what makes these events feel confusing, because the house may look fine during the coldest hours and then show damage once the thaw begins.
Watch for subtle changes that point to hidden water travel. A ceiling spot that grows darker, a baseboard that starts to swell, or paint that looks slightly bubbled often means water is moving behind the surface. Smell can also be a clue. Damp insulation and wet wood can produce a stale, musty odor quickly, even without visible drips. If you hear the sound of running water when every fixture is off, treat it as a leak until a professional confirms otherwise. Your goal is not to hunt for the crack yourself. Your goal is to recognize that the house may be taking on water even when the source is out of sight.
Shut Off Water Fast and Reduce Pressure in the System
Once you suspect a cracked pipe, stop the supply first. Head to the main water shutoff and close it fully. A partial shutoff can leave pressure in the lines, and pressure is what pushes water through a split and into wall cavities. After the shutoff is closed, open a couple of faucets on the lowest level of the home so the plumbing system can drain down. This step reduces pressure and helps limit how much water remains poised above the break, especially if the damaged line sits on an upper floor.
If you cannot locate the main shutoff or if it will not turn on, treat it as an urgent professional situation. Old valves can fail, and forcing them can create a new leak at the worst time. If water is leaking near outlets, power strips, appliance cords, or a panel area, keep people out of that zone and shut off power at the breaker only if you can do it without stepping into wet areas. Move rugs, towels, and stored items away from wet spots so water does not wick farther across the flooring. These actions are about stabilizing your home. They buy time and prevent a plumbing break from turning into a whole-room flood.
Contain Water Damage Without Turning It into a Bigger Project
Water rarely stays right where the pipe cracked. It follows framing members, runs along the outside of the pipe, and collects at seams and low points. A stain on a ceiling can mean water traveled several feet before it found a place to show itself. Start by finding the lowest visible point of water and set up a catch zone with a bucket and absorbent towels. If drywall on a ceiling looks swollen, bowed, or soft to the touch, keep people out from under it. Wet drywall can hold weight and then release it all at once.
Open under-sink cabinet doors and remove stored items so air can circulate. That space traps moisture and can keep wood damp for long stretches if it stays closed. If you see wet flooring, focus on removing standing water first. After that, you want airflow and steady warmth, not extreme heat concentrated in one spot. Avoid placing high-heat devices directly against walls or cabinetry. Heat that is too intense can warp finishes and still fail to dry the hidden cavity behind the surface. Your best approach is calm and controlled: Keep water from spreading, keep vulnerable materials exposed for inspection, and prepare the space for a professional to locate the source and assess what needs repair or drying.
How a Pro Locates the Break Without Random Wall Removal
A cracked pipe can sit in a hard-to-see area, and the water path can be misleading. Trained plumbers tends to work in a deliberate sequence. They may isolate plumbing zones, check pressure behavior after shutoff, and narrow down which branch line is involved. They may use moisture readings to map where water spreads behind surfaces, which helps identify the direction of travel. Thermal tools can help reveal cold bands where freezing likely occurred or damp areas that hold a different surface temperature than dry materials.
Listening tools can also be useful when a leak is active and water is moving inside a wall cavity. In accessible spaces like basements or crawlspaces, visual inspection of fittings and joints can reveal a split or a damaged coupling. Your observations help the process. Share which fixtures lost flow first, whether the issue started after a night of very low temperature, and where stains or drips appeared. A targeted approach reduces unnecessary openings and helps focus repair work on the correct section. It also helps identify nearby components that may have been stressed during the freeze, even if they have not failed yet.
What Happens After the Pipe Repair: Drying and Material Decisions
Stopping the leak is only the first phase. Water that soaked drywall, insulation, or subflooring can remain trapped and continue to cause problems. A professional may check moisture levels in affected areas and recommend drying steps based on the materials that were exposed to water and for how long. Drywall that stayed lightly damp and dried quickly may recover, while drywall that turned soft, swollen, or crumbly often needs removal. Wet insulation tends to hold water and can keep framing damp, which leads to staining and odor if it stays in place.
Flooring reactions vary. Hardwood can cup or crown when moisture reaches it from below. Laminate can swell at seams. Vinyl plank can trap water underneath, leaving moisture against the subfloor. Tile can hide subfloor dampness for a long time. Electrical safety matters too. If water reaches outlets, switches, lighting, or appliance connections, an electrician may need to check those components before they are used again. You are not trying to rush the house back to “normal” in a day. You are trying to prevent a second wave of damage that comes from lingering moisture and overlooked wet zones.
Get Back to Dry, Safe, and Steady
Once the water is off and the immediate mess is under control, the next step is getting the repair done the right way, then figuring out why the freeze happened so you do not face the same break during the next cold snap. That is where Rosenberg Plumbing & Air can step in with professional pipe repair and replacement, leak detection to find hidden splits behind walls and ceilings, and freeze-prevention support for exposed or vulnerable lines. If you are dealing with a frozen pipe crack right now, call Rosenberg Plumbing & Air and let us help you stop the leak, protect your home, and get back to normal.
Tags: Plumbing tips